
Monday, November 7, 2011
Count Peyton
Here is a layout I did of my grandson Count Peyton. I just love his costume and think his mother did an awesome job on his makeup. Title and date is from Alphalicious. The rest of the cuts are from Everyday Paper Dolls. I dry embossed the moon and added some ink to make it pop a little more. Added white and gold marker on all other cuts. I just love doing Halloween layouts. Thanks for looking :))

Too Cute to Spook
This is a layout I did of my grandson. He was a purple dino for his first Halloween. I thougtht the title fit him well. All cuts are from Everyday Paper Doll cartridge. The faces on the trick-or-treater's are Peachy Keen Stamps. Thanks for looking :))


Thursday, October 27, 2011
Christmas Cards 2011
I worked on my Christmas cards for 3 days and finally done with them. This is the first year that I got them done well in advance. I hate rushing more than anything.
Recipe:
Recollection ready made cards for the base.
Recollection Christmas stamp set.
Watercolor pencils (cant remember which brand)
Watercolor paper
Red ink
Green ink
Diamond stickles
Green cardstock
Red cardstock
Snowflake Cuttlebug embossing folder
First start by cutting mats to fit card base. Embossed mat with Cuttlebug Snowflake folder. Stamp Santa Clause onto watercolor paper. Color with watercolor pencils. I used Diamond Stickles on all white areas to give them substance. They looked awesome. The pictures really dont do them justice. They may have taken 3 days but are well worth it. Thanks for looking :-)


Tuesday, October 25, 2011
Explosion Box
This weekend my Mom & Dad came in for a visit. I dont get to see them as much any more because they moved 8 hours away from me. I am not liking that !! Anyway when my mother & I get together we have to make at least one full day of crafting. We spent Monday making an Explosion Box, Earring holder, and Frame. We also had planned to start on our Christmas cards but didn't make it that far. LOL Anyway here is the Explosion Box I made....

This is the first layer (bottom). This layer was 12x12 paper scored at 4 inches all the way around. cutting out all four corners. I placed mats, then picture corners. Do not embellish the center as you will glue the second layer to it.

2nd layer
Here is the second layer. It is cut at 11x11. Scored at 3 3/4" all the way around cutting out the corners. Again place picture mats and corners to each one. Do not embellish the center as you will glue the final layer to it.

3rd layer
Here is the third layer. It is cut at 10x10 and scored at 3 1/2" all the way around cutting out the corners. Again place picture mats and corners to each one. This is the final layer so go ahead and decorate the center.

Finished w/lid
For the lid cut an 8x8 piece of paper and score at 2". I think next time I may score at 1 1/2" as the lid fit very tightly and hard to get on. Decorate the outside. Adhere 12 photos to the layers. Fold all layers up to form the sides of the box and place lid on.

There you are. All finished. I loved this project. It was very easy and fun to make and will make a wonderful gift. My grandmother is always wanting pictures so I developed 13 pics to add. I thought this would make a great gift for her. Thanks for checking it out. :-)
Wednesday, October 12, 2011
Dad's Birthday Card
Here is a Birthday card I made my dad. They are coming in this weekend. I am so excited! His birthday is the first week of November but I never get to spend it with him. They usually come up in September or October. We usually go down for a visit either at Thanksgiving or Christmas. So I decided I was going to have him a surprise birthday party. He is a cowboy at heart so I thought he would love this stamp set. It is from Stampin' Up.


Monday, October 10, 2011
Tri-Shutter Baby Album for baby boy
Here is a Tri-Shutter album I made for a friend that had her baby boy over the weekend. I had so much fun making it. I had been intimidated by these albums thinking I was not capable of making one. I seen a tutorial online and let me tell you....it was very simple!! It holds 3 4x6 photos and can be displayed on a shelf or dresser. I hope she enjoys it as much as I did making it. :-)


Wednesday, June 15, 2011
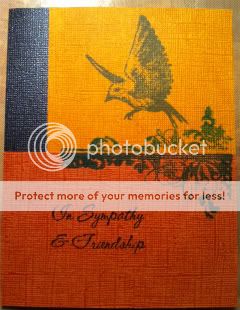
I was a very busy lady last night. I had planned on making my dad's Father's Day card and as I was setting up to make that I received the news my ex brother-n-law had passed away. I am not fond of making Sympathy cards but tried my best. I was rather pleased with the Father's Day card I made. I usually cant figure out what to do with the inside, but this stamp set had these cute little stamps. The stamp set was from a card kit club I was subscribed to. My dad is always saying he is an antique so I found this card very fitting. I also got a head start and made one to match for my husband's bday which isn't until December. No I didn't let him see the card I made for my dad. :-)


Monday, March 14, 2011
Helping Hands

Here was a fun page I did with me and my step-grandson. He loves helping me and is such a sweetheart!! I wanted to make this page extra special for him. I used the bright primary colors since it is a childlike layout.
Recipe...
A Child's Year - lg. hands @ 2/5" sm. hands @ 1.5"
Cuttin Up -title @ 1.5"
Indie Art -water drops @ 1"
Snow pages
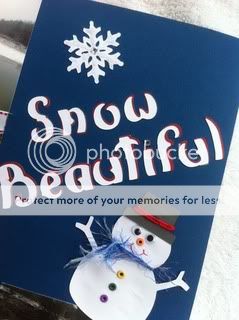
I wouldn't exactly call this a double layout...maybe mirror image layout. I really love the layout and wanted a layout to fit 4 photos each. I love doing snow pages. Both are real simple layouts.
Sorry for the glare on the right side layout :-(

Recipe for Snow Beautiful...
Christmas - snow flakes @ 2"
Ashlyn's Alphabet - title @ 1/25"
Doodlecharms -snowman 2'5"
I added ribbon to separate the pics. I didn't care for it without the ribbon. I added stickles and bling to the snow flakes for some sparkle. I added brads, fibers, and googly eyes to the snowman. (I just love him)

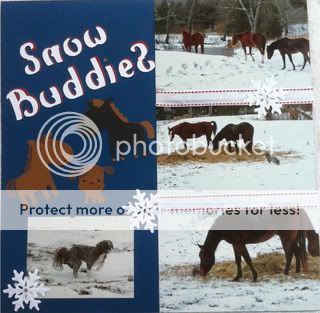
Recipe for Snow Buddies...
Christmas -snow flakes @ 2"
Ashlyn's Alphabet - title @ 1/25"
Create A Critter - horses @ 2/5" & dog @ 1/5"
I added stickles & bling to the snow flakes for some sparkle. This page was very simple.
Sorry for the glare on the right side layout :-(
Recipe for Snow Beautiful...
Christmas - snow flakes @ 2"
Ashlyn's Alphabet - title @ 1/25"
Doodlecharms -snowman 2'5"
I added ribbon to separate the pics. I didn't care for it without the ribbon. I added stickles and bling to the snow flakes for some sparkle. I added brads, fibers, and googly eyes to the snowman. (I just love him)
Recipe for Snow Buddies...
Christmas -snow flakes @ 2"
Ashlyn's Alphabet - title @ 1/25"
Create A Critter - horses @ 2/5" & dog @ 1/5"
I added stickles & bling to the snow flakes for some sparkle. This page was very simple.
Birthday layout

Here is a layout I did of my birthday party this year. It is a little busy for me. I was trying to step out of the box. I like all but the title. To me you cant read it very well. Here is the recipe...
A Child's Year -balloons @ 2.5"
Doodlecharms -party hat @ 3.25"
Gypsy Wanderings -pink photo mat @ 4"x3/25" & title (Party) @ 2.5"
Ashlyn's Alphabets - "It's my" @ 1/5"
Wednesday, March 9, 2011
Peachy Keen Stamps "Let's Face it Friday" Sew Super Sweet Challenge! First bath layout
Here is a layout I did of my grandson's first bath at his Memaw & Papaw's house. This was also his first overnight visit with us. It was the first of many and we LOVE it!! We had so much fun that night. He loves taking a bath. I had a lot of fun designing this layout. Here is the recipe...
Sm. circles - Plantin Schoolbook cut at 2 1/2"
Lg. circle - Plantin Shcoolbook cut at 3"
Baby face - Paper Doll Dress Up cut at 2 1/2" blackout feature.
bathtime journal block - New Arrival cut at 4 1/4"
Ducks - New Arrival cut at 1"
Bath tub - New Arrival cut at 3"
I used Peachy Keen Stamp for the baby's face. I pop dotted the circles, ducks, and baby face to give deminsion. I also added faux stitching around the mats, circles, ducks, and tub. On the bubbles that have his picture in them, I used Glossy Accents to fill in to look like water. This was my first time to use this product and love the way it came out. :-)
Friday, March 4, 2011
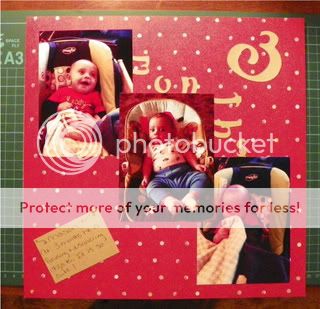
3 month layout
Here is another layout for my grandson. I am now caught up on his monthly layouts. Yay!! Like I said before I am keeping them simple so it will be easier to keep up with. I used Ashlyn Alphabet for title.
Grandson's 2 month layout
Here is my precious grandson's 2 month LO. I am keeping the monthly pages simple so I dont get behind. I used Ashlyn Alphabet for the title and frame. I used Plantin Schoolbook to cut the picture out for the circle. The circle is actually the inside of the frame. Thanks for looking :)

Monday, February 21, 2011
Birth and 1 month layout
I have finally started on my grandson's monthly layouts. He is now three months old. On the birth layout I used Ashlyn's Alphabets for the title. The other embellishments are punch outs from the paper pack. I cant remember the name of the paper pack. I got it at Hobby Lobby. I did a little doodling with a red marker to tye in the air plane trails on the paper.

This is the layout for his 1 month pictures. I used Plantin Schoolbook for the "1". I used my gypsy to make it wider. The word "month" and journaling box is punch outs from the paper pack I bought at Hobby Lobby.

This is the layout for his 1 month pictures. I used Plantin Schoolbook for the "1". I used my gypsy to make it wider. The word "month" and journaling box is punch outs from the paper pack I bought at Hobby Lobby.
Tuesday, February 15, 2011
Valentine Cards for kids
The first one "Dino Mite" was for son's girlfriend' little boy. The second one "Nuts about U" for our son's girlfriend's little girl. I used Create a Critter for both cards. That is a real fun cartridge. I am so glad I purchased it!! I used foam squares to add dimension on the Dino Mite card. Both cards are the same on the inside.


Thursday, February 3, 2011
Peachy Keen Stamp Challenge
I am entering this card in Peachy Keen Stamps challenge this week. It was a monochromatic color scheme. It will also be my husband's valentine card. I used Sweethearts cart for all the hearts. I used Gypsy font for the alpha. I used Peachy Keen Stamp for the face. TFL

Wednesday, February 2, 2011
Home for the Holidays
Here is a layout I did for our Family Christmas pictures. I wanted to use the little house because I collect village houses, church, stores and accessories to go with it. It is my favorite holiday decoration to put out. I also wanted to use the title because our kids are grown and spread out and I love them coming home for the holidays. I used Joys of the Season cartridge. I used Gypsy font and welding the letters on my Gypsy I got for Christmas. I LOVE my Gypsy !!!


Subscribe to:
Posts (Atom)